Sunday, July 1, 2012

Here comes the……wedding invitations?


Where O’ where has PaperCuts been?!?!  Apparently, I am not the world’s best blogger sorry to say but I have been working hard all summer.  This summer has been full of weddings, showers, baptism and of course birthday parties.  So there has been a lot of paper to cut. 

One of the biggest events has been a wedding which I eagerly designed and produced wedding invites for. What a job that was but how much did I love the results.  The bride was a family member who wasn’t sure what she wanted except that the invites be purple and silver.  After, torturing her with several rounds of “what do you like”, we settled on a glittery pocket design.  I drafted a sample for her approval and once she gave me the ‘ok’, I set to work creating these works of art.


Awww, made me want to go back and redesign my wedding invites. Mr PaperCuts quickly nixed that idea though, booooo.

Wednesday, May 16, 2012

Guess Whooo Is Having a Baby

That's the theme of a Baby Shower one of my returning customers is throwing. She was sweet enough to ask me to come up with a banner and centerpieces for this little shindig.  Since my little miss papercut's first birthday was a Owl theme, anything owl related has a special place in my heart.

I made this adorable "Baby Girl" Banner based on the color scheme she gave me.  I threw in the little tree as a cute tie into the playful theme.

In addition to the banner, she also wanted centerpieces that would allow for ballons to be attached. This meant we need something heavy enough to weight it down but still be able to remain on the table as a centerpiece. So I created 8" Owl balls with tiny hooks hidden on the top of the head to attach the ballons.  I just love these little guys.

Tuesday, May 1, 2012

Third "Princess" Edition: Stepping out of the "paper" box

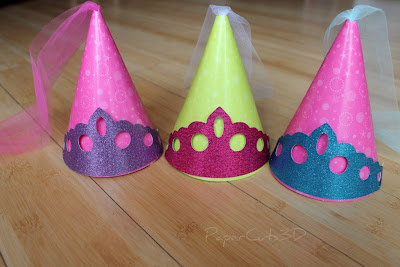
So to end my Princess-themed posting, I promised I would give a tutorial on how to create the Princess-in-waiting hats. This is a really quick and easy  project to do at a party or on a lazy Saturday with your little Princess. *Please ignore the constantly changing colors, I didn’t have time recreate the project so I constructed this tutorial using the pictures I already had.


For this project you will need:  a cone hat, crown cut out, small strip of tulle, scissors and double sided tape or a stapler.

Step 1: Cut the tip off the top of your cone hat. Don’t make the hole to big or you will have a hard time keeping your tulle inside. Pull one end of your tulle thru the hole and tie a knot on the inside to keep it in place. I use tape to make the end of tulle easier to push thru the hole.
Step 2: Cut out your crown in any color you choose. You can also decorate it with glitter, stickers or jewels. Tape or staple the cut out on to the front of your hat.
And TA DA instant Princess Hat!!

Tuesday, April 24, 2012

Every Princess Needs a Crown (Part 3)

I find something special in making a birthday hat. Besides the cake, the decorations, and the outfit it's the most important part of the party :)  And this one had to be special.  There is definitely a challenge in merging a crown with a party hat.  It has to be pretty, functional and royal.  First, I picked the paper for the hat which was a beautiful shimmering pattern that screamed royal. Next, I literally dismantled a crown and merged it with the hat. The hat would make it functional and stay put on her head throughout the party, important for an active 7 year old.  Last, I added tulle draping from the top to give it a touch of fantasy.

I just love, love, love this hat. I seriously thought of keeping it myself.  In the end I handed it over to the Birthday girl.  Her face and expression was payment enough for all the work it took to create this one-of-a-kind hat.


The Princesses-In-Waiting, also known as, party guest also needed their own hats.  I wanted them to be similar to the Birthday girl's hat, so I made paper replicates of her hat. And as a bonus since the parents were looking for craft project  to do at the party, I delivered them dismantled.  The girls loved picking out their favorite colors and putting together a princess hat fit for them. I think I may have to do a Tutorial on this one, so the Princess Saga continues!

Tuesday, April 17, 2012

Every Princess Accessorizes (Part 2)

Besides the banner, the parents asked me to provide a couple of other decorations for the Princess  party to make it a Happy Ever After.  Namely, cupcake toppers and wall cutouts. No problem, I already had a design in mind. Out came the glitter paper and jewels because you can’t accessorize a Princess party without them.  These little guys fit the theme perfectly.
Next, they let me know they were completely bored with the ‘run of the mill’ party favors and asked if I had anything unique I could put together. Of course I did and I crazy was excited to make these.  You would think they were for me. I did make an extra one for Little Miss Papercuts because she just loves bags.  These little tutu bags are just so much cool and perfect for a Princess or Ballerina party.  All the little princesses were delighted to take these home filled with goodies.

Friday, April 13, 2012

Every Girl Wants To Be A Princess (Part 1)

Or at least have a party like one. Which is why I enjoyed this project so much.  That and the parents didn't have a set vision, so I got a chance to flex my creative side more. They knew they wanted it to be Princess but more fantasy less Disney. They simply requested I chose a color scheme and create a Banner, Hats, Cupcake Toppers and Favor bag.  What a large order to have creative control over and what trust these parents had in me. I did not want to disappoint, so I put forth everything I could think of. For the color scheme, I decided to go with Teal, Purple and of course Pink because you can't do princess with Pink!

For the Banner, I wanted go pretty meets fantasy. I picked up some awesome fantasy patterned paper as well as some glittered paper.  You have to have glitter, it is essential as pink.  I, also, wanted to do a different shape for the banner rather than traditional circle and square.  So I went with a scalloped diamond to give it a regal theme.  I think it came out adorably and the mom was thrilled.

Since the parents requested a tall order, I'm going to break this out into several post so stay tuned.

Monday, April 9, 2012

The Prodigal Paper Cutter Returns!

Let me just apologize to my "few" loyal readers, I have had a lot going on over in here in PaperCuts land. Some exciting news about the PaperCuts family but I'm not ready to reveal yet. I know such a tease but I do have something to show today.  Even though, you haven't heard from me, I have been working. So I thought I would show you what I have been up to.
PaperCuts has recently broken into the corporate world!  I was asked to create a banner and large number of centerpieces for a Retirement Party for Engineer retiring after a very long  and successful career. I was told he was a simple man but loved Notre Dame.

For the Banner, I went with simple football lettering with the famous gold and blue Notre Dame is known for.


The centerpieces followed the same gold and blue theme.  Since they didn't want to go with the traditional flowers route, I decided to fill the blue vases with paper Pompoms and adorn each one with farewell sayings.


Everything came out cute and simple.  The company was pleased with the decorations and I got to try something fun and different.