Sunday, August 5, 2012

Come to the end of the rainbow


Little Miss PaperCuts has grown up and is going off to college. Ok no seriously, she is just turning 3 but it feels like time is flying so fast that will be the next thing to happen. I am feel so many emotions happy, proud, sad, sentimental but most of all I feel like it time to celebrate. Especially since this is her last birthday as an only child……. YUP!! I am finally coming out the closet (though very very late) PaperCuts is expanding by two little baby feet. We are expecting a little Miss or Mr PaperCut in a few week. Sorry it took me so long announce but pregnancy flies when you are cutting paper.  Here is the announcement I shared with our family.


So back to Little Miss PaperCuts birthday party.  The theme is Rainbows! She saw an episode of Dora with a Rainbow party and just kept talking about rainbows so I thought it would be perfect. It took me a lot of time to put together the perfect party and it had to have the perfect invite. After hours of pouring over some great designs on the internet and my brain, I put together this little hybrid.  Isn’t it the cutest!!

Friday, August 3, 2012

Soon To Be Mrs


Back to my lovely bride.  Since she happened to be family, I was able to contribute to a lot to her wedding. Her bridal shower being one of my key areas.  Banners are always fun to make so I thought would make one for the guest to see when they came in.  I wanted to do something reminiscent of her wedding invitations that reminded everyone of who she would soon be.  The bride-to-be was quite pleased and even took the banner home.  Mission accomplished.

Sunday, July 29, 2012

Blessed Favor


This summer has been full of events for PaperCuts, shockingly not all birthday parties. Not that I don’t love a good birthday design but it’s nice to flex our range.  A good friend and client contacted me about her baby boy’s baptism a while back. She had a great idea of making an important part of her baby’s blessing into favors for the guest AND knocking out some sitting issues also. Her only issue was how to implement it. 

I loved the idea and quickly ran with the idea.  Since part of the Greek Orthodox blessing involved oil, she wanted to give each attending family their own bottle of oil to take home. To take it further since Greeks do it big (we have all seen the movie) she had a ton of family coming and needed to put together a seating arrangement for the banquet afterwards.  

Our plan was to take the design used on the baptism invitation and design labels for the oil favors that also doubled as the seating cards. It came together so much better than we could have imagined. We even managed to include Jordan Almonds in the favor as they are a staple in Greek events. 

The baptism was beautiful, the guest loved their oil and everyone knew exactly were to seat. A perfect event!

Sunday, July 15, 2012

Ribbon and Bows


I love how PaperCuts has been crossing state line lately!! This order came all the way from California.  A sweet lady requested a birthday banner for a little girl’s birthday party. The theme was ribbon and bows to which the customer had already fallen in love with a certain banner.  Since she couldn’t buy that banner, she wanted me to make something similar with some changes for the birthday girl.  I loved the colors she requested and the pure sweetness of this design.

Sunday, July 1, 2012

Here comes the……wedding invitations?


Where O’ where has PaperCuts been?!?!  Apparently, I am not the world’s best blogger sorry to say but I have been working hard all summer.  This summer has been full of weddings, showers, baptism and of course birthday parties.  So there has been a lot of paper to cut. 

One of the biggest events has been a wedding which I eagerly designed and produced wedding invites for. What a job that was but how much did I love the results.  The bride was a family member who wasn’t sure what she wanted except that the invites be purple and silver.  After, torturing her with several rounds of “what do you like”, we settled on a glittery pocket design.  I drafted a sample for her approval and once she gave me the ‘ok’, I set to work creating these works of art.


Awww, made me want to go back and redesign my wedding invites. Mr PaperCuts quickly nixed that idea though, booooo.

Wednesday, May 16, 2012

Guess Whooo Is Having a Baby

That's the theme of a Baby Shower one of my returning customers is throwing. She was sweet enough to ask me to come up with a banner and centerpieces for this little shindig.  Since my little miss papercut's first birthday was a Owl theme, anything owl related has a special place in my heart.

I made this adorable "Baby Girl" Banner based on the color scheme she gave me.  I threw in the little tree as a cute tie into the playful theme.

In addition to the banner, she also wanted centerpieces that would allow for ballons to be attached. This meant we need something heavy enough to weight it down but still be able to remain on the table as a centerpiece. So I created 8" Owl balls with tiny hooks hidden on the top of the head to attach the ballons.  I just love these little guys.

Tuesday, May 1, 2012

Third "Princess" Edition: Stepping out of the "paper" box

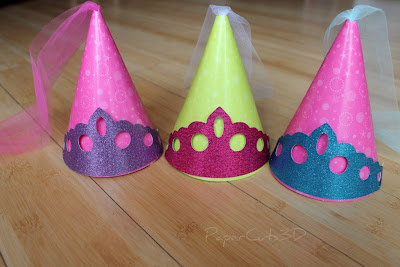
So to end my Princess-themed posting, I promised I would give a tutorial on how to create the Princess-in-waiting hats. This is a really quick and easy  project to do at a party or on a lazy Saturday with your little Princess. *Please ignore the constantly changing colors, I didn’t have time recreate the project so I constructed this tutorial using the pictures I already had.


For this project you will need:  a cone hat, crown cut out, small strip of tulle, scissors and double sided tape or a stapler.

Step 1: Cut the tip off the top of your cone hat. Don’t make the hole to big or you will have a hard time keeping your tulle inside. Pull one end of your tulle thru the hole and tie a knot on the inside to keep it in place. I use tape to make the end of tulle easier to push thru the hole.
Step 2: Cut out your crown in any color you choose. You can also decorate it with glitter, stickers or jewels. Tape or staple the cut out on to the front of your hat.
And TA DA instant Princess Hat!!